Hi!
You can download source code of my previous tutorial here.
Alex: Sorry for late.
Cheers! :)


Database Workbench 7 Release 2 now available
2 weeks ago
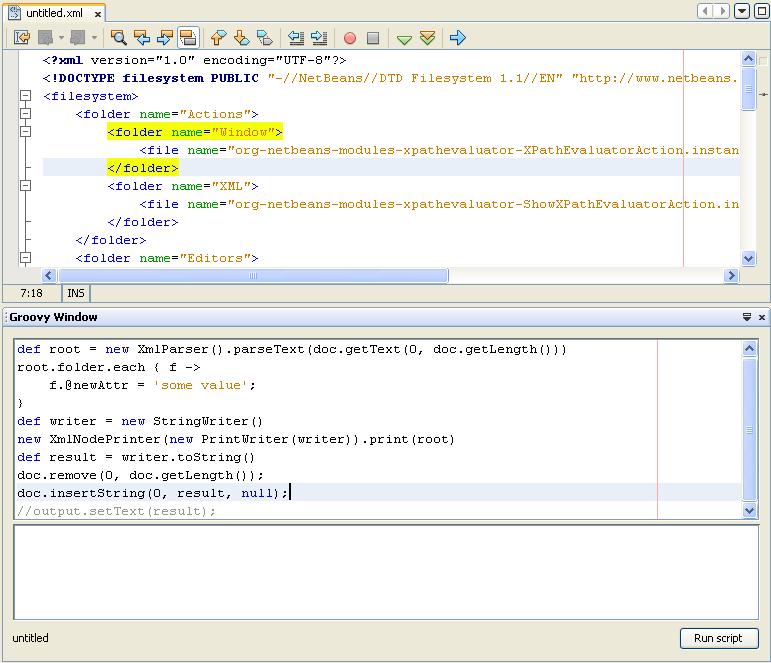
Binding binding = new Binding();
binding.setVariable("doc", xmlDoc);
binding.setVariable("output", jTextArea1);
GroovyShell shell = new GroovyShell(binding);
shell.evaluate(jEditorPane1.getText());


    FileSystem fs = FileUtil.createMemoryFileSystem();
    FileObject fob = fs.getRoot().createData(name, "txt");

    DataObject data = DataObject.find(fob);
    EditorCookie cookie = (EditorCookie)data.getCookie(EditorCookie.class);
    cookie.open();
Feel free to comment.
I do a lot XML and Xslt processing at my workplace. Altova XmlSpy has XPath tool for evaluating queries on edited XML file. I'm missing that (useful) feature in Netbeans so I decided to build something similar. Of course it's far away from Altova's version in features but it can be useful (and you can always extend it).


In project tree right click on Libraries Node > Add module dependency...


protected void performAction(Node[] activatedNodes)
{
    EditorCookie editorCookie = activatedNodes[0].getLookup().lookup(EditorCookie.class);

    try
    {
        DocumentBuilderFactory domFactory = DocumentBuilderFactory.newInstance();
        domFactory.setNamespaceAware(true);
        DocumentBuilder builder = domFactory.newDocumentBuilder();
        Document doc = builder.parse(((org.openide.text.CloneableEditorSupport) editorCookie).getInputStream());

        XPathEvaluatorTopComponent win = XPathEvaluatorTopComponent.findInstance();
        win.setDocument(doc);
        win.open();
        win.requestActive();
    }
    catch (SAXException ex)
    {
    //Exceptions.printStackTrace(ex);
    }
    catch (ParserConfigurationException ex)
    {
    //Exceptions.printStackTrace(ex);
    }
    catch (IOException ex)
    {
    //Exceptions.printStackTrace(ex);
    }
}
Press Ctrl+I to fix imports.
Make sure you select org.w3c.dom.Document from combo box.
We have to:
This method is simple. It evaluates text from jTextField1 control and fills jTextArea1 control with results after clearing the same. If there were errors it shows them at bottom of window (jLabel2). xmlDoc is current xml document.
private void evaluate()
{
    if (xmlDoc != null)
    {
        try
        {
            XPathFactory factory = XPathFactory.newInstance();
            XPath xpath = factory.newXPath();
            XPathExpression expr = xpath.compile(jTextField1.getText());

            NodeList nodes = (NodeList) expr.evaluate(xmlDoc, XPathConstants.NODESET);
            jTextArea1.setText("");
            for (int i = 0; i < nodes.getLength(); i++)
            {
                jTextArea1.setText(jTextArea1.getText() + nodes.item(i).getNodeValue() + "\n");
            }
        }
        catch (XPathExpressionException ex)
        {
            jLabel2.setText(ex.getMessage());
        }
    }
}
Append following code at the end of XmlPathEvaluatorTopComponent's constructor:
jTextField1.getDocument().addDocumentListener(new DocumentListener()
{
    public void insertUpdate(DocumentEvent e)
    {
        evaluate();
    }

    public void removeUpdate(DocumentEvent e)
    {
        evaluate();
    }

    public void changedUpdate(DocumentEvent e)
    {
    }
});
Following code is based on Netbeans Selection Managment Tutorial I. We have to listen for global selection changes of "Object". In our case it is XmlDataObject. We have to extend our TopComponent to implement LookupListener.
final class XPathEvaluatorTopComponent extends TopComponent implements LookupListener
LookupListener provides a method for handling changes (resultChanged(LookupEvent ev)).
We have to check if there are any instances of XmlDataObject
selected and change xmlDoc value according to that.
public void resultChanged(LookupEvent arg0)
{
    // if this window selected then do nothing
    if (TopComponent.getRegistry().getActivated().equals(this))
    {
    // do nothing
    }
    else
    {
        Lookup.Result r = (Lookup.Result) arg0.getSource();

        Collection c = r.allInstances();
        // if there are instances
        if (!c.isEmpty())
        {
            try
            {
                XMLDataObject o = (XMLDataObject) c.iterator().next();
                setDocument(o.getDocument());
                evaluate();
                jLabel2.setText(o.getName());
                jTextArea1.setEnabled(true);
                jTextField1.setEnabled(true);
            }
            catch (IOException ex)
            {
                jLabel2.setText(ex.getMessage());
            }
            catch (SAXException ex)
            {
                jLabel2.setText(ex.getMessage());
            }
        }
        else
        {
            xmlDoc = null;
            jTextArea1.setEnabled(false);
            jTextField1.setEnabled(false);
            jLabel2.setText("no selection");
        }
    }
}
Now we have to register LookupListener. We will do that when window is opened:
@Override
public void componentOpened()
{
    Lookup.Template tpl = new Lookup.Template(org.openide.loaders.XMLDataObject.class);
    result = Utilities.actionsGlobalContext().lookup(tpl);
    result.addLookupListener(this);
}
When we close window we have to unregister the listener:
@Override
public void componentClosed()
{
    result.removeLookupListener(this);
    result = null;
}
We have to create a member for holding the result where lookup listener is registered.
You can find explanation for this in Netbeans Selection Managment Tutorial I.


In project tree right click on Libraries Node > Add module dependency...


# DDL Visualizer
# created by Damir Tesanovic (tdamir.blogspot.com)

TOKEN:keyword:("create" | "table" | "constraint" | "unique" | "primary"
                | "key" | "foreign" | "references"
                | "smallint" | "integer" | "float" | "double" | "precision"
                | "decimal" | "numeric" | "date" | "time" | "timestamp"
                | "char" | "varchar" | "blob")

TOKEN:identifier:( ["a"-"z" "A"-"Z" "_"] ["a"-"z" "A"-"Z" "0"-"9" "_"]* ("." ["a"-"z" "A"-"Z" "_"] ["a"-"z" "A"-"Z" "0"-"9" "_"]*)? )
TOKEN:identifier:( "\"" [^ "\""]* "\"" )

TOKEN:operator:("<=" | "<>" | "<" | "=" | ">=" | ">" | "||" | "-" | "," | ";" | ":" | "/" | "." | "(" | ")" | "[" | "]" | "*" | "+")

TOKEN:whitespace:( [" " "\t" "\n" "\r"]+ )
TOKEN:number:(["0"-"9"]+)

# parser should ignore whitespaces
SKIP:whitespace

# definition of grammar
S = (CreateTable)*;

CreateTable = "create" "table" TableName TableDef;

TableDef = "(" ColumnDef ("," (ColumnDef | TableConstraint))* ")";

ColumnDef = ColumnName DataType;

TableConstraint = ["constraint" ConstraintName]
                    (("unique" | "primary" "key") "(" ColumnName ("," ColumnName)* ")" | ForeignKeyClause)
                    ;

ForeignKeyClause = "foreign" "key" "(" ColumnName ("," ColumnName)* ")" ReferencesClause;

ConstraintName = <identifier>;
TableName = <identifier>;
ColumnName = <identifier>;
Integer = <number> ;

ReferencesClause = "references" TableName ["(" ColumnName ("," ColumnName)* ")"];

DataType = "smallint" | "integer" | "float" | "double" "precision"
            | ( "decimal" | "numeric" ) [ "(" Integer [ "," Integer ] ")" ]
            | "date" | "time" | "timestamp"
            | ( "char" | "varchar" ) [ "(" Integer ")" ]
            | "blob"
            ;

# error highlighting
MARK:ERROR: {
type:"Error";
message:"Syntax error.";
}

MARK:error: {
type:"Error";
message:"Unexpected character.";
}


<folder name="Editors">
 <folder name="text">
  <folder name="x-fbsql">
   <file name="language.nbs" url="language.nbs"/>
   <folder name="Popup">
    <file name="org-myorg-ddlvisualizer-ShowDiagram.shadow">
     <attr name="originalFile" stringvalue="Actions/Tools/org-myorg-ddlvisualizer-ShowDiagram.instance"/>
     <attr name="position" intvalue="700"/>
    </file>
   </folder>
  </folder>
 </folder>
</folder>
We will add functionality to created action later.
package org.myorg.ddlvisualizer;

import java.awt.Image;
import java.awt.Point;
import java.util.ArrayList;
import java.util.Iterator;
import org.netbeans.api.languages.ASTNode;
import org.netbeans.api.visual.action.ActionFactory;
import org.netbeans.api.visual.vmd.VMDGraphScene;
import org.netbeans.api.visual.vmd.VMDNodeWidget;
import org.netbeans.api.visual.vmd.VMDPinWidget;

/**
 *
 * @author Damir Tesanovic (based on Anton Epple's DBGraphScene)
 */
public class DDLVisualScene extends VMDGraphScene {

    private static int edgeID = 1;

    public DDLVisualScene() {
        this.getActions().addAction(ActionFactory.createZoomAction());
        this.getActions().addAction(ActionFactory.createPanAction());

    }

    public void setASTNode(ASTNode node) {
        for (ASTNode table : getNodes(node, "CreateTable", false)) {
            String tableName = table.getNode("TableName").getTokenTypeIdentifier("identifier");
            createNode(this, (int) (Math.random() * 800), (int) (Math.random() * 800), tableName, "Table", null);

            for (ASTNode col : getNodes(table, "ColumnDef", true)) {
                String columnName = col.getNode("ColumnName").getTokenTypeIdentifier("identifier");
                createPin(this, tableName, tableName + ":" + columnName, columnName, columnName);
            }

            for (ASTNode foreignKeyClause : getNodes(table, "ForeignKeyClause", true)) {
                ArrayList<String> cols = new ArrayList<String>();
                for (ASTNode col : getNodes(foreignKeyClause, "ColumnName", false)) {
                    cols.add(col.getTokenTypeIdentifier("identifier"));
                }

                String refTableName = foreignKeyClause.getNode("ReferencesClause").getNode("TableName").getTokenTypeIdentifier("identifier");
                ArrayList<String> refCols = new ArrayList<String>();
                for (ASTNode refCol : getNodes(foreignKeyClause.getNode("ReferencesClause"), "ColumnName", false)) {
                    refCols.add(refCol.getTokenTypeIdentifier("identifier"));
                }

                for (int i = 0; i < cols.size(); i++) {
                    createEdge(this, refTableName + ":" + refCols.get(i), tableName + ":" + cols.get(i));
                }

            }
        }

        this.moveTo(null);

    }

    private ArrayList<ASTNode> getNodes(ASTNode root, String nt, boolean deep) {
        ArrayList<ASTNode> nodes = new ArrayList<ASTNode>();
        fillNodes(root, nodes, nt, deep);
        return nodes;
    }

    private void fillNodes(ASTNode node, ArrayList<ASTNode> out, String nt, boolean deep) {
        Iterator it = node.getChildren().iterator();
        while (it.hasNext()) {
            Object elem = it.next();
            if (elem instanceof ASTNode) {
                if (((ASTNode) elem).getNT().equals(nt)) {
                    out.add((ASTNode) elem);
                }
                if (deep) {
                    fillNodes((ASTNode) elem, out, nt, deep);
                }
            }
        }
    }

    private static String createNode(VMDGraphScene scene, int x, int y, String name, String type, java.util.List<Image> glyphs) {
        String nodeID = name;
        if (!scene.getNodes().contains(nodeID)) {
            VMDNodeWidget widget = (VMDNodeWidget) scene.addNode(nodeID);
            widget.setPreferredLocation(new Point(x, y));
            widget.setNodeProperties(null, name, type, glyphs);
        }
        return nodeID;
    }

    private static void createPin(VMDGraphScene scene, String nodeID, String pinID, String name, String type) {
        if (!scene.getPins().contains(pinID)) {
            ((VMDPinWidget) scene.addPin(nodeID, pinID)).setProperties(name, null);
        }
    }

    private static void createEdge(VMDGraphScene scene, String sourcePinID, String targetPinID) {
        String edgeID = "edge" + DDLVisualScene.edgeID++;
        scene.addEdge(edgeID);
        System.out.println("createEdge " + sourcePinID + "<->" + targetPinID);
        scene.setEdgeSource(edgeID, sourcePinID);
        scene.setEdgeTarget(edgeID, targetPinID);
    }

    private void moveTo(Point point) {
        int index = 0;
        for (String node : getNodes()) {
            getSceneAnimator().animatePreferredLocation(findWidget(node), point != null ? point : new Point(++index * 100, index * 100));
        }
    }
}
It has setASTNode(ASTNode node) method which goes through AST tree and builds diagram.


private static final String PREFERRED_ID = "VisualizerTopComponent";
private DDLVisualScene scene = new DDLVisualScene();

private VisualizerTopComponent() {
 initComponents();
 setName(NbBundle.getMessage(VisualizerTopComponent.class, "CTL_VisualizerTopComponent"));
 setToolTipText(NbBundle.getMessage(VisualizerTopComponent.class, "HINT_VisualizerTopComponent"));
 // setIcon(Utilities.loadImage(ICON_PATH, true));
 jScrollPane1.setViewportView(scene.createView());
}
Thanks to Generic Languages Framework we can easily get AST tree from document. We will pass it to scene and then show VisualizerTopComponent. Replace performAction method with following code:
protected void performAction(Node[] activatedNodes) {
 try {
  EditorCookie editorCookie = activatedNodes[0].getLookup().lookup(EditorCookie.class);
  Document doc = editorCookie.getDocument();
  ParserManager pm = ParserManager.get(doc);

  VisualizerTopComponent win = VisualizerTopComponent.findInstance();
  win.getScene().setASTNode(pm.getAST());
  win.open();
  win.requestActive();
 } catch (ParseException ex) {
  Exceptions.printStackTrace(ex);
 }
}
Here is sample file for testing.
create table EMPLOYEE (
    EMP_NO integer,
    FIRST_NAME varchar,
    LAST_NAME varchar
)

create table PROJECT (
    PROJ_ID integer,
    PROJ_NAME varchar,
    PROJ_DESC varchar,
    TEAM_LEADER integer,

    constraint fkey1 foreign key (TEAM_LEADER) references EMPLOYEE (EMP_NO)
)

create table EMPLOYEE_PROJECT (
    EMP_NO integer,
    PROJ_ID integer,

    constraint fkey1 foreign key (EMP_NO) references EMPLOYEE (EMP_NO),
    constraint fkey2 foreign key (PROJ_ID) references PROJECT (PROJ_ID)
)


